


")
Exploring Australia in a campervan is a dream for many backpackers. The freedom to travel at your own pace and the ability to camp in some of the country’s most stunning locations makes this mode of travel incredibly appealing. If you’re planning to equip your van or campervan for the ultimate road trip, this step-by-step guide will help you through the process, ensuring you create a comfortable and functional mobile home.
Table of Contents
DIY Campervan Fitouts: Freedom & Flexibility
For backpackers and long-term travelers, DIY fitouts are a budget-friendly solution. Buying a second-hand van and customizing it yourself gives you full control over the layout and budget.
- Estimated budget: AUD $1,000–$5,000 depending on materials and appliances.
- Key items to consider: Bed structure with storage, basic kitchen (gas stove, sink, water tank), insulation, curtains, and solar panels if you want to stay off-grid.
- Tools & skills required: At least basic carpentry, electrical knowledge (or hiring an electrician for safety), and a lot of patience.
👉 Useful tip: Bunnings, IKEA, and Facebook Marketplace are popular places to find affordable materials and second-hand appliances.
Professional Campervan Fitouts: Comfort & Reliability
If DIY is not your thing, or if you want a high-quality setup with a resale value, consider professional fitout companies.
- Price range: AUD $8,000–$25,000+ depending on size, finish, and equipment.
- Advantages: Safety certification, higher comfort, optimized space usage, professional electrical and plumbing installation.
- Drawback: Higher upfront investment, but often easier resale.
🚗 GREAT DEAL : Your customized vehicle available as soon as you arrive in Australia !
If you’re planning to go on a Road Trip as soon as you arrive in Australia, the best option is to go through backpackercars.com. They offer all types of vehicles for sale (cars, vans, and 4x4s) and customize them according to your needs. The advantage is that all mechanics are checked, the paperwork is in order, and you can leave with it as soon as you arrive in Australia.
📍 Vehicles available in Sydney, Melbourne, and Perth
📝 Avoid all the paperwork
👨🔧 Avoid unpleasant mechanical surprises with a reliable vehicle
🚗 Pick up your vehicle as soon as you arrive in Australia
🚨 BONUS : 1 year of free assistance (Roadside Assistance) with our PROMO CODE : BACKPACKERS
Legal Requirements & Certification
In Australia, certain modifications (such as gas installation and 240V electricity) must be certified by licensed professionals. This ensures safety and avoids issues when registering or selling the van later.
- Gas certification: Around AUD $150–$300.
- Electrical compliance: Usually AUD $300–$500 depending on the system.
Choose the Right vehicle – Step 1
Compare the different models
Several brands of vans are sold in Australia. The most common are : Toyota Hiace, Mitsubishi Delica, L300, Kia Pregio, etc… According to your needs and your project, we advise you to make a comparative table with the strong points / weak points of each model. For example, the Kia Pregio, has many advantages including a chain distribution and not by timing belt (unbreakable), it has a diesel engine (faster), and a consumption of less than 10l/100km guaranteeing more than 700 km per tank. Moreover, it is one of the most recent models at affordable prices.
Compare prices
The next important thing to do is to see what the market is like, especially in the city where you are thinking of buying your vehicle. You will surely find many offers, with big price differences and different mileage… Another important point to take into account is that empty vans will be much cheaper.
Several months before your departure and when you think you have found the model that suits you, we advise you to check the ads regularly. This will give you an idea of the evolution of the market and the prices.
Plan your Fitout: Step 2
Assess your needs
Before you start, consider how you plan to use your campervan. Think about the following:
- Duration of Trips: Short weekend getaways or extended road trips?
- Travel Companions: Solo travel, with a partner, or group trips?
- Activities: Surfing, hiking, or simply relaxing?
Budget
Set a budget for your fitout. Be realistic about costs and prioritize essential items first. It’s possible to do a budget fitout, but some items might require more investment. See below for a price idea.
Layout design
Sketch a layout for your campervan. Consider where you’ll place the bed, kitchen, storage, and any other features you need. Look for inspiration online and in campervan communities.
Buy the Equipment – Step 3
The next step is to fit it out and DIY and car stores will become your best allies during this period. Bunnings, Super Cheap Auto and Ikea will be the best places to find the equipment you need. Kmart and BigW can also be useful stores for everything that is buying storage, small accessories.
As for tools, consider checking Marketplace or Gumtree to buy them second hand. This will make you save a lot of money.
Campervan Conversion – A step-by-step guide
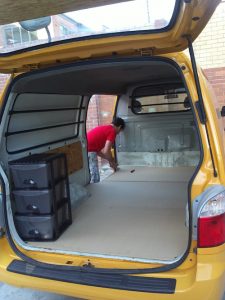
Floor
Thoroughly clean the interior and inspect for any repairs needed. Check for rust, leaks, or mechanical issues and address them before starting your fitout.
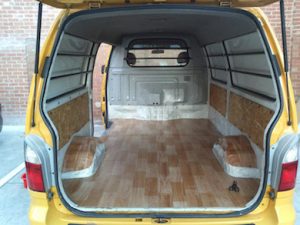
Then lay out the floor with 3mm thick plywood (over the entire surface) and linoleum flooring on top. Choose durable, easy-to-clean materials such as vinyl, laminate, or carpet tiles. Ensure the flooring is water-resistant and can withstand wear and tear.
Cut the flooring to fit your van’s layout. Use adhesive to secure it in place, making sure it lies flat and covers all areas.
Bed
You can buy a folding bed at IKEA. On a Kia it is likely that you will have to raise it by 10cm with the help of cleats because the rear wheel can get in the way. The good point is that this will also allow you to save space in storage under the sofa bed.

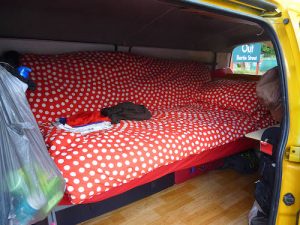
Another option is to construct a sturdy bed frame using plywood or timber. Consider a design that allows for storage underneath. A popular choice is a platform bed with lift-up or pull-out compartments. Build cabinets and storage units to fit your layout. Use lightweight materials to avoid adding too much weight to the van. Ensure all units are securely fastened to prevent movement while driving.
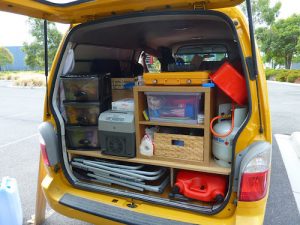
Kitchen
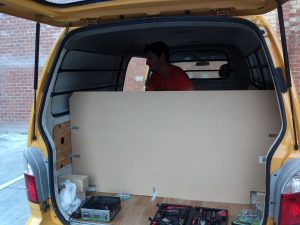
It is easier to install the kitchen area at the back of the van. It’s also more convenient for ventilation when cooking, and you can shelter under the back door if it rains. Separate the kitchen area from the sleeping area with a plywood board.
Install a countertop using materials like plywood or butcher block. Add a sink with a water pump system and a grey water tank for drainage. Portable sinks with hand pumps are a budget-friendly option. Use a 12V water pump for running water in the sink. Connect it to your water tanks and ensure it operates smoothly.
You can then arrange it to your liking with storage units purchased at Kmart (or recovered on the street – quite common in big cities).
Choose between a 12V refrigerator or an ice cooler, depending on your budget and power setup. Secure the fridge or cooler to prevent it from moving while driving. You will find electric cooler at affordable prices and of good quality at Super Cheap Auto.
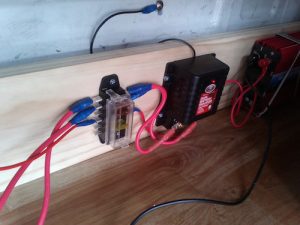
Electrical System
The most important thing is to remember to isolate the two batteries from each other when they are connected in parallel as here, otherwise there is a danger. And also that the batteries are relatively identical (Volts/Ampere) even if it is not mandatory. When you buy the batteries, you will have an installation manual that details how to do it, step by step. It is important to follow all the steps.
It’s best to get expert advice to do everything the right way. That’s safer, especially if you don’t have any knowledge about it.
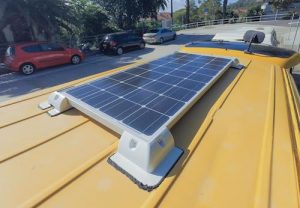
If you don’t drive a lot, the second battery will not hold the charge well to continuously power the cooler. In this case you could install a solar panel on the roof of your vehicle. The installation is quite simple, you just have to think to isolate it from the second battery and to dimension well the installation. For ex: 12v cooler consumes 43W + 1 computer + 2 tel, we turn around 75W so a 90W panel will be perfect). You can go to specialized stores like RoadTechMarine. They will give you everything ready to use! Plan a budget of about 500$ for the installation of a panel.
Install LED lights for energy-efficient illumination. Consider both overhead lights and task lighting for specific areas like the kitchen and bed.
Comfort and Decor
Choose a comfortable mattress or foam pad. Use fitted sheets and bedding that are easy to clean and store.
Install curtains or blinds for privacy and to block out light. Use curtain rods or magnetic strips for easy installation.
Personalize your campervan with decor that makes it feel like home. Add cushions, rugs, and wall hangings to create a cozy atmosphere.
Budgeting for Your Fitout
Here’s a quick overview of common costs in 2025:
- Professional full fitout: AUD $10,000–$20,000+
- Basic bed frame & storage: AUD $200–$400
- Portable gas cooker: AUD $50–$150
- Fridge: AUD $300–$1,000
- Solar panel kit: AUD $500–$1,200
- Insulation & ventilation: AUD $400–$800


